Rigid board insulation — often called foam board — is one of the most versatile products we install. It packs a high R-value into a thin profile and, applied as a continuous layer, solves a problem that cavity insulation alone cannot: heat slipping straight through your framing.
How Rigid Board Insulation Works
Rigid board comes in firm, lightweight panels rather than the fluffy blankets most people picture when they think of insulation. Its defining advantage is that it can be installed as an unbroken layer across walls, ceilings, or foundations, instead of only fitting between studs and joists.
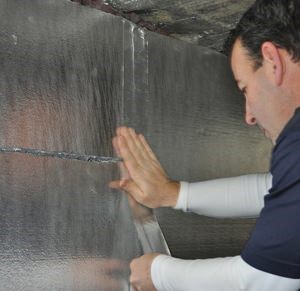
That continuity matters more than most homeowners realize. Wood framing conducts heat — a standard stud has an R-value of only about R-1.25 per inch — so even a wall with perfectly insulated cavities still bleeds energy through every stud and plate. Builders call this thermal bridging. A layer of foam board laid over the framing blankets those weak spots and keeps the whole assembly performing evenly. When the seams are taped and sealed, that same layer also doubles as an air barrier.
Three types are common, and they differ mainly in R-value and moisture resistance:
- EPS (expanded polystyrene): about R-4 per inch, the most affordable option.
- XPS (extruded polystyrene): about R-5 per inch, with strong moisture resistance.
- Polyiso (polyisocyanurate): about R-6 to R-6.5 per inch — the highest of the three, and often foil-faced to add a radiant barrier.
For comparison, fiberglass batt runs roughly R-3 to R-4 per inch, so foam board delivers noticeably more resistance in the same thickness.
Where We Use It in a Home
Because it resists moisture and installs as a continuous sheet, rigid board earns its place in areas where other insulation struggles:
- Basement and foundation walls, where its moisture tolerance is a real advantage below grade.
- Rim and band joists, a notorious source of drafts where the floor framing meets the foundation.
- Under exterior siding, as continuous exterior insulation that wraps the house and breaks thermal bridging.
- Cathedral ceilings and flat roofs, where cavity depth is limited and every inch counts.
- Under concrete slabs and at attic hatches, sealing spots that are easy to overlook.
The Honest Pros and Cons
We believe in matching the material to the job, so here is a straight assessment.
Advantages
- High R-value in a thin profile, ideal where space is tight.
- Continuous coverage that reduces thermal bridging across framing.
- Strong moisture resistance, especially with XPS and polyiso.
- Adds rigidity and a measure of sound dampening to the assembly.
Trade-offs
- More labor to cut, fit, and seal than rolling out batts.
- It won't conform to irregular cavities, so gaps must be sealed with foam or tape.
- Higher material cost than fiberglass.
- Foam is combustible, so building codes require it to be covered with a thermal barrier — typically half-inch drywall — in living spaces.
What to Expect During Installation
Every project starts with an assessment so we can confirm foam board is the right choice and specify the correct thickness for your target R-value. On install day, our crew cuts the panels to fit, fastens or adheres them to the surface, then tapes and seals every seam so the layer performs as one continuous barrier. Gaps around pipes, wires, and edges are filled with sealant, and where the boards are exposed inside a living space, they are finished with drywall to meet fire code. It is a clean, low-dust process, and most homes are completed in a day or two depending on scope.
If you are weighing rigid board against spray foam, fiberglass, or blown-in for your home, the smartest first step is a free energy audit. We will walk your house, find where it is losing energy, and recommend the right material for each area — no pressure, no guesswork. Call The Home Insulators at 914-825-6824 to schedule yours. Most homeowners we serve across Westchester, Rockland, and Bergen County see 20% or more come off their monthly energy bills.